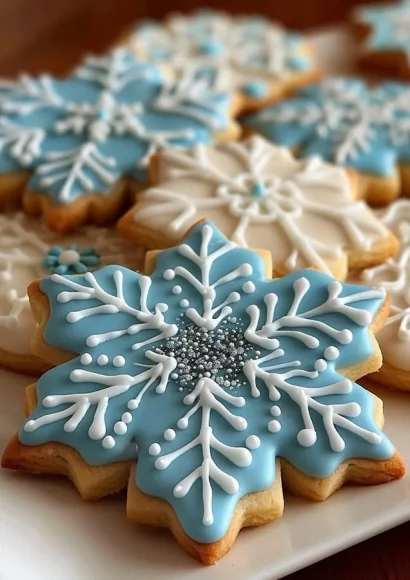
Snowflake Sugar Cookies
Snowflake Sugar Cookies are the quintessential holiday treat, capturing the essence of the winter season with their delicate shapes and sweet, buttery flavors. This delightful recipe offers a step-by-step approach to creating perfect cookies that are not only visually stunning but also irresistibly delicious. Each bite melts in your mouth, offering a sense of warmth and comfort that brings families together during the chilly months. These cookies are worth making, whether for holiday gatherings, cookie exchanges, or just to enjoy with a warm cup of cocoa.
Why You’ll Love This Recipe
One of the standout features of Snowflake Sugar Cookies is their simplicity, making them perfect for bakers of all skill levels. With just a handful of ingredients, the prep is straightforward, allowing you to whip up a batch in no time. These cookies are family-friendly, ensuring that little ones can join in on the fun of rolling out dough and cutting out shapes. Plus, the classic combination of butter, sugar, and vanilla ensures that every bite is a delightful treat. Whether you opt for traditional icing or colorful designs, the customization options are endless, making them a joy to create and share.
Ingredients for Snowflake Sugar Cookies
- 2 3/4 cups all-purpose flour – Soft and versatile for a tender texture.
- 1 teaspoon baking powder – To help the cookies rise just perfectly.
- 1/2 teaspoon salt – Enhances the sweetness.
- 1 cup unsalted butter, softened – Rich and creamy, forming the buttery base.
- 1 1/2 cups sugar – For that sweet, satisfying flavor.
- 1 large egg – Acts as a binding agent for the perfect dough.
- 1 teaspoon vanilla extract – The aromatic ingredient that elevates the flavor.
- 1/2 teaspoon almond extract (optional) – Adds a nutty warmth.
- 1 egg white (or 2 tablespoons meringue powder) – For crafting fluffy royal icing.
- 1 1/2 cups powdered sugar – The main component for icing.
- 1/2 teaspoon lemon juice – To stabilize and brighten the icing.
- Food coloring (optional) – Add a touch of creativity to your designs.
Step-by-Step Directions for Snowflake Sugar Cookies
-
Preheat the Oven: Begin by preheating your oven to 350°F (175°C). Line your baking sheets with parchment paper for easy removal of the cookies after baking.
-
Mix Dry Ingredients: In a medium bowl, whisk together the flour, baking powder, and salt. This ensures that your leavening agent is evenly distributed throughout the flour.
-
Cream Butter and Sugar: In a large mixing bowl, beat the softened butter and sugar together until the mixture becomes light and fluffy. This step is crucial for incorporating air into the dough, leading to a tender cookie.
-
Add Wet Ingredients: Crack in the large egg, and pour in the vanilla and almond extracts (if you’re using it). Mix well to combine these ingredients thoroughly.
-
Combine Mixtures: Gradually add your dry ingredients into the wet mixture. Stir carefully until the dough comes together, but avoid overmixing to keep it tender.
-
Roll Out the Dough: On a floured surface, roll out the dough to about 1/4 inch thick. Use a snowflake-shaped cookie cutter to cut out your cookie shapes. Place each cookie on the prepared baking sheets.
-
Bake the Cookies: Slide the sheets into your preheated oven and bake for 8-10 minutes, or until the edges are lightly golden. Keep a close watch to prevent over-baking.
-
Cool the Cookies: Once baked, let the cookies cool completely on a wire rack to ensure they maintain their shape and texture.
-
Prepare Royal Icing: In a mixing bowl, whisk the egg white or meringue powder with lemon juice until soft peaks form. Gradually add powdered sugar while mixing until stiff peaks are achieved.
-
Decorate the Cookies: Divide the icing into bowls and add food coloring, if desired. Use piping bags or a spatula to create beautiful snowflake designs on your cooled cookies. Allow the icing to dry completely before serving or packaging.
Tips & Tricks for Snowflake Sugar Cookies
Crafting the perfect Snowflake Sugar Cookies can be enhanced with these helpful tips:
- Chill the Dough: If the dough feels too soft to roll out, chilling it in the refrigerator for about 30 minutes can make handling much easier.
- Use Quality Ingredients: Opt for high-quality butter and pure vanilla extract. This elevates the flavor of your cookies significantly.
- Bake in Batches: If making multiple trays, it’s best to bake them one at a time to ensure even baking.
- Decorative Icing: For those who wish to explore, try edible glitter or sprinkles on the icing to add some shimmer to your snowflake cookies.
- Test the Icing: Ensure your royal icing is the right consistency by doing a “figure 8” test. If it holds its shape for 8 seconds, you’re in good shape!
Serving Suggestions & Pairings
Presenting your Snowflake Sugar Cookies beautifully can enhance any gathering. A lovely idea is to arrange them on a decorative platter, sprinkled with artificial snow or fake snowflakes for a winter wonderland theme. Pair these sweet delights with steaming mugs of hot cocoa or spiced chai for a cozy afternoon treat. For a festive touch, consider packaging them in clear bags tied with festive ribbons and gifting them to friends or neighbors.
Nutritional Information for Snowflake Sugar Cookies
While these cookies offer a sweet treat, moderation is key. Each cookie contains approximately:
- Calories: 130
- Fat: 6g
- Carbohydrates: 19g
- Protein: 1g
These cookies are ideal as an occasional indulgence, bringing joy without much guilt when savored alongside holiday festivities.
Storing Tips & Variations for Snowflake Sugar Cookies
To keep your cookies fresh, store them in an airtight container at room temperature. They can stay delicious for up to a week. For longer storage, consider freezing the unbaked dough. Roll it into logs, wrap securely in plastic wrap, and freeze for up to three months. When you’re ready, simply slice and bake a fresh batch! For variations, try incorporating spices like cinnamon or nutmeg for a seasonal twist, or substitute some flour for almond flour for a nutty flavor.
Conclusion for Snowflake Sugar Cookies
Now that you have the delightful recipe for Snowflake Sugar Cookies, it’s time to gather your ingredients and enjoy the process of baking. These cookies are not only a festive treat but also a wonderful way to create lasting memories with loved ones. Don’t hesitate—get your baking gear ready and indulge in the sweet magic of the season with these charming cookies!
FAQs
1. Can I use margarine instead of butter?
While you can use margarine, butter provides a richer flavor and better texture for the cookies.
2. How long do I need to let the icing dry?
Typically, royal icing can take anywhere from 1 to 4 hours to dry completely, depending on the humidity and thickness of your icing.
3. Can I make the dough in advance?
Absolutely! You can refrigerate the dough for up to 3 days before baking or freeze it for up to three months.
4. What can I substitute for egg whites in the icing?
Meringue powder is a great substitute for egg whites and offers the same stiffness needed for icing.
5. How can I make my cookies softer?
Experiment with reducing the baking time slightly or adding an extra egg yolk for a softer texture in the dough.
Baking Snowflake Sugar Cookies will not only fill your home with delightful aromas but will also warm hearts with their sweetness and charm. Enjoy the baking journey and happy holidays!

Snowflake Sugar Cookies
Ingredients
Method
- Begin by preheating your oven to 350°F (175°C). Line your baking sheets with parchment paper for easy removal of the cookies after baking.
- In a medium bowl, whisk together the flour, baking powder, and salt. This ensures that your leavening agent is evenly distributed throughout the flour.
- In a large mixing bowl, beat the softened butter and sugar together until the mixture becomes light and fluffy.
- Crack in the large egg, and pour in the vanilla and almond extracts (if you’re using it). Mix well to combine these ingredients thoroughly.
- Gradually add your dry ingredients into the wet mixture. Stir carefully until the dough comes together, but avoid overmixing to keep it tender.
- On a floured surface, roll out the dough to about 1/4 inch thick. Use a snowflake-shaped cookie cutter to cut out your cookie shapes. Place each cookie on the prepared baking sheets.
- Slide the sheets into your preheated oven and bake for 8-10 minutes, or until the edges are lightly golden. Keep a close watch to prevent over-baking.
- Once baked, let the cookies cool completely on a wire rack to ensure they maintain their shape and texture.
- In a mixing bowl, whisk the egg white or meringue powder with lemon juice until soft peaks form. Gradually add powdered sugar while mixing until stiff peaks are achieved.
- Divide the icing into bowls and add food coloring, if desired. Use piping bags or a spatula to create beautiful snowflake designs on your cooled cookies. Allow the icing to dry completely before serving or packaging.