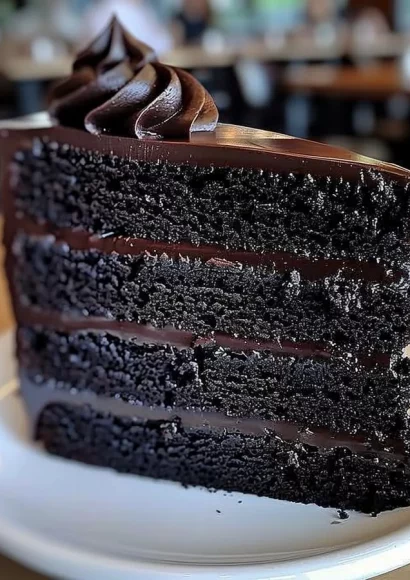
Black Velvet Cake
When it comes to desserts that evoke a sense of indulgence and luxury, Black Velvet Cake stands out with its rich, dark allure. This delightful cake, known for its velvety texture and deep chocolate flavor, is the ultimate treat for any occasion. In this step-by-step recipe, we will guide you through the simple yet rewarding process of creating this extraordinary cake that promises to tantalize your taste buds and impress your guests.
The aroma of baking chocolate wafts through the kitchen, inviting you into a world where friends and family gather around a table, sharing stories and laughter. With its tender layers and creamy frosting, Black Velvet Cake is not just a dessert; it’s an experience filled with warmth and comfort. Whether it’s a celebration or a simple family gathering, this cake is sure to be the star of the show.
History / Fun Fact
Black Velvet Cake has an interesting backstory that dates back to the early 20th century. Its origin can be traced to the deep, dark backgrounds of Southern cuisine, similar to the beloved Red Velvet Cake. The term “velvet” refers to the cake’s exceptionally smooth and moist texture that melts in your mouth. It is said that the association with "black" draws from the rich cocoa that gives the cake its dark color and flavor. Fun fact: The cake was reportedly inspired by the need to create a dessert that could match the grandeur of special occasions. This velvety treat has since become a staple in modern bakeries, enjoyed by chocolate lovers worldwide.
Ingredients
For this decadent Black Velvet Cake, you will need:
- 2 cups all-purpose flour – a soft, powdery base that provides structure.
- 1 cup granulated sugar – sweet and crystalline, adding just the right touch of sweetness.
- 1 cup buttermilk – creamy and tangy, creates a moist cake.
- 1/2 cup unsalted butter, softened – rich and buttery, for a luscious mouthfeel.
- 1/4 cup vegetable oil – light and smooth, helps maintain moisture.
- 2 large eggs – for binding and fluffiness.
- 2 tbsp black cocoa powder – the star of the show, dark and aromatic, lending it a deep flavor profile.
- 1 tbsp unsweetened cocoa powder – adding a touch of bitterness to balance sweetness.
- 1 tsp baking powder – ensures the cake rises beautifully.
- 1/2 tsp baking soda – for leavening, making the cake light and airy.
- 1/2 tsp salt – enhancing all the flavors.
- 1 tbsp white vinegar – a secret ingredient that interacts with baking soda for extra lift.
- 1 tsp vanilla extract – aromatic and warm, bringing depth to the cake.
- Black food coloring (gel or paste) – for that striking, deep black hue.
These ingredients come together to create a cake that is not just rich and flavorful but visually stunning as well.
Cooking Time & Tips For Black Velvet Cake
When it comes to baking Black Velvet Cake, timing is key. A quick preparation method allows you to whip up this cake in about an hour, while a more leisurely approach lets the flavors meld beautifully. For best results, consider letting the batter sit for a few minutes before baking, enhancing its texture.
To ensure success with your Black Velvet Cake, here are some practical tips:
- Use room temperature ingredients, particularly eggs and buttermilk, to help the batter emulsify better.
- Sift your dry ingredients to aerate them, which contributes to the cake’s fluffy texture.
- Bake the cakes until they just spring back when touched; overbaking can dry them out.
Step-by-Step Directions
-
Preheat the oven: Set your oven to 350°F (175°C) to prepare for baking. The preheating ensures that your cake rises perfectly from the start.
-
Prepare the pans: Grease and flour two 9-inch round cake pans or line them with parchment paper to prevent sticking.
-
Sift the dry ingredients: In a large bowl, sift together the flour, black cocoa powder, unsweetened cocoa powder, baking powder, baking soda, and salt. Inhale the rich aroma as the cocoa powder combines with the flour, creating a heavenly chocolatey base.
-
Mix the wet ingredients: In another bowl, whisk together the buttermilk, granulated sugar, vegetable oil, softened butter, eggs, vanilla extract, and white vinegar. The buttermilk creates an inviting creaminess, while the vinegar enhances the cake’s texture.
-
Add food coloring: To achieve that iconic deep color, add a few drops of black food coloring. This step is crucial for the signature black velvet look!
-
Combine the mixtures: Gradually add the dry ingredients to the wet mixture, stirring gently until just combined. Be careful not to overmix; you want to preserve that light, fluffy texture.
-
Fill the pans: Pour the batter into the prepared cake pans, dividing it evenly. The rich, dark liquid should look enticing as it fills the pans, setting the stage for the beauty that will emerge once baked.
-
Bake: Place the pans in the oven and bake for 30-35 minutes, or until a toothpick inserted into the center comes out clean. As the cake bakes, the aromas of decadent chocolate fill your kitchen.
-
Cool the cakes: Let the cakes cool in the pans for 10 minutes before transferring them to a wire rack. Allow them to cool completely, as frosting a warm cake can lead to melting mishaps!
-
Frost: Once cooled, frost the cakes with your favorite frosting—cream cheese frosting pairs beautifully with the rich chocolate flavor, but feel free to get creative!
Serving Suggestions & Occasions
Black Velvet Cake is perfect for various occasions, from birthdays to holiday gatherings. Serve it with a scoop of vanilla ice cream on the side, or pair it with a steaming cup of coffee for a delightful afternoon indulgence. Decorating the cake with fresh berries or edible flowers can elevate its presentation, adding a pop of color to the deep black hue.
Common Mistakes For Black Velvet Cake
While making your Black Velvet Cake, it’s essential to avoid common mistakes that may lead to less-than-ideal results. One common pitfall is not measuring ingredients accurately, which can affect the texture and flavor. Overmixing the batter can lead to a dense cake; remember, gentle folds are key. Finally, keep an eye on your baking time — checking for doneness a few minutes early can save your cake from drying out.
Healthier Alternatives & Variations
If you’re looking for healthier alternatives or variations for your Black Velvet Cake, consider using whole wheat flour or almond flour for added nutrition. You can also substitute unsweetened applesauce for some of the butter to reduce fat while keeping the moistness intact. For a vegan version, replace eggs with flaxseed meal or a commercial egg substitute, and use non-dairy milk. Customize the flavors by adding coffee or espresso powder for a mocha twist!
FAQs
-
Can I make this cake ahead of time?
Yes, the cakes can be baked and stored in the refrigerator for up to three days before frosting. -
What type of frosting works best?
Cream cheese or buttercream frosting pairs wonderfully with the chocolate flavor of the cake. -
Can I freeze Black Velvet Cake?
Absolutely! Wrap tightly in plastic wrap and place in an airtight container. It can be frozen for up to three months. -
Is black cocoa powder different from regular cocoa powder?
Yes, black cocoa powder is extremely dark and has a unique flavor profile that gives the cake its signature color and taste. -
How can I achieve a more intense chocolate flavor?
Consider using a higher ratio of black cocoa powder, or add a bit of instant espresso powder to intensify the richness. -
Can I decorate my Black Velvet Cake?
Of course! Feel free to get creative with garnishes—chocolate shavings, fondant decorations, or fresh fruit can enhance visual appeal.
Conclusion
Now that you have this step-by-step guide to crafting the perfect Black Velvet Cake, it’s time to get into the kitchen and whip up this delectable dessert. With its luscious texture and captivating flavors, each slice is sure to bring joy and create lasting memories. So gather your ingredients, and indulge in the beauty of baking — you won’t regret it!
Black Velvet Cake
Ingredients
Method
- Preheat the oven to 350°F (175°C).
- Grease and flour two 9-inch cake pans or line them with parchment paper.
- In a large bowl, sift together the flour, black cocoa powder, unsweetened cocoa powder, baking powder, baking soda, and salt.
- In another bowl, whisk together buttermilk, sugar, vegetable oil, butter, eggs, vanilla extract, and white vinegar.
- Add black food coloring, mixing until the color is well incorporated.
- Gradually add the dry ingredients to the wet mixture, stirring until just combined.
- Pour the batter into the prepared pans.
- Bake for 30-35 minutes, or until a toothpick inserted into the center comes out clean.
- Allow the cakes to cool in the pans for 10 minutes before transferring to wire racks.
- Frost with your favorite frosting once cool, preferably cream cheese frosting.