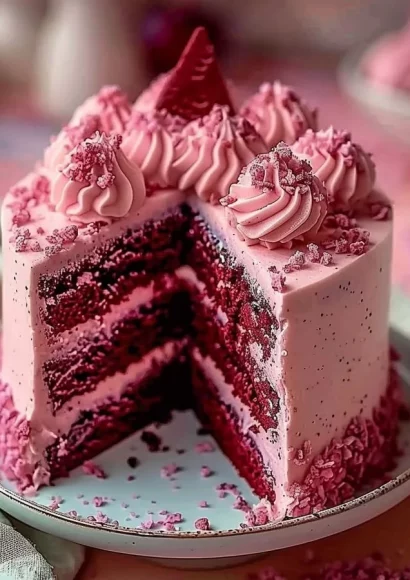
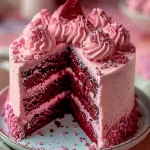
Pink Velvet Dream Cake
Indulge in the delightful experience of making a Pink Velvet Dream Cake, a recipe that promises to enliven your senses and transform any gathering into a celebration. This cake embodies a harmonious blend of moist, tender layers with the enticing essence of vanilla and cocoa. As you embark on this step-by-step journey of baking, you’ll find yourself submerged in the sweet aroma that wafts through your kitchen, evoking pleasant memories and joyful emotions. It’s not just a cake; it’s an experience that nurtures the heart and soul.
History / Fun Fact
The origin of velvet cakes dates back to the 19th century, with the allure of their rich, smooth textures captivating dessert lovers. The “red velvet” cake initially drew attention for its mysterious appearance, linked closely to the culinary practices of the Southern United States. Over time, variations of this delightful cake emerged, leading us to the whimsical Pink Velvet Dream Cake that has become a favorite for celebrations and gatherings. Adding a blush of color, this version makes every slice as visually stunning as it is delicious, symbolizing joy and love in every bite.
Ingredients
Gather the following ingredients for this stunning Pink Velvet Dream Cake:
- 2 1/2 cups all-purpose flour – A versatile foundation, providing the perfect structure for each delicate layer.
- 1 1/2 cups granulated sugar – Sweetness that balances the cake’s richness, leaving a lovely sugary whisper on your palate.
- 1 tsp baking soda – A key leavening agent, ensuring a light, airy texture with each slice.
- 1 tsp salt – A precise touch to enhance flavors, guiding your taste buds through the experience.
- 1 tsp cocoa powder – Just enough to create a subtle backdrop that highlights the cake’s rich flavors without overpowering them.
- 1 1/2 cups vegetable oil – Providing moistness, the oil contributes to a luscious consistency that melts in your mouth.
- 1 cup buttermilk, at room temperature – A creamy addition that nurtures the cake’s tender crumb.
- 2 large eggs, at room temperature – Binding ingredients together with a rich flavor profile that enriches each bite.
- 2 tbsp red food coloring – Infusing the cake with a vibrant hue, making every slice pop with personality.
- 1 tsp white vinegar – An unexpected ingredient that enhances the reaction with baking soda, ensuring the cake rises beautifully.
- 1 tsp vanilla extract – A fragrant note that ties all the flavors together harmoniously.
- 8 oz cream cheese, softened – The star of the frosting, offering creaminess with a tangy twist.
- 1/2 cup unsalted butter, softened – Adding richness and a velvety texture to your frosting.
- 4 cups powdered sugar – Bringing sweetness and a fluffy consistency to your indulgent topping.
- 1 tsp vanilla extract – Enhancing the frosting’s aroma and flavor, ensuring every element is alluring.
Cooking Time & Tips For Pink Velvet Dream Cake
Creating this cake can be a joyous journey, ranging from quick preparations when time is of the essence to slow-paced, relaxed baking that allows you to savor the process. For those short on time, the cake can be swiftly prepared in about an hour, allowing you to indulge in a sweet treat with minimal fuss. If you choose to take your time, enjoy the soothing rhythm of baking, letting each step unfold beautifully.
Additionally, here are some practical tips for success: always ensure your ingredients are at room temperature, as this will lead to a more homogenous batter. When mixing the dry and wet ingredients, be careful not to overmix, as this can lead to a dense cake. Tuning into these details will help you create a show-stopping Pink Velvet Dream Cake every time.
Step-by-Step Directions For the Cake
- Preheat your oven to 350°F (175°C), letting warmth fill the air as you prepare your cake pans.
- Grease and flour two 9-inch round cake pans, ensuring a smooth release for your delightful creations.
- In a large bowl, whisk together the all-purpose flour, granulated sugar, baking soda, salt, and cocoa powder, creating a dry mix that has a soft, cloud-like texture.
- In a separate bowl, combine the vegetable oil, buttermilk, eggs, red food coloring, white vinegar, and vanilla extract. Whisk until thoroughly blended, revealing a stunning red mixture that transforms into the heart of your cake.
- Gradually add the wet mixture to the dry ingredients, mixing gently until just combined. The swapping of colors is a stunning sight, like a beautiful painting unfolding before your eyes.
- Divide the batter evenly between the prepared cake pans, watching as your creation takes form.
- Bake for 25-30 minutes or until a toothpick inserted in the center comes out clean. The smell of baking will fill your kitchen, making your mouth water in anticipation.
- Once baked, allow the cakes to cool in the pans for about 10 minutes. Then, transfer them to a wire rack to cool completely, embracing the sweet scent that lingers in your kitchen.
For the Cream Cheese Frosting:
- In a mixing bowl, beat the softened cream cheese and unsalted butter together until smooth and creamy, letting your mixer work its magic.
- Gradually add the powdered sugar and vanilla extract, beating until you achieve a light, fluffy consistency. The frosting should be spreadable, yet hold its shape beautifully.
Assemble the Cake:
- Once the cakes have completely cooled, place one layer on a decorative plate. Generously frost the top with your luscious cream cheese frosting, inviting all to sink into its creamy allure.
- Place the second layer atop the frosted first layer and gently spread frosting over the top and sides, creating a delightful masterpiece.
- Decorate as you wish, perhaps with sprinkles or fresh fruits, allowing your creativity to shine through.
Serving Suggestions & Occasions
The Pink Velvet Dream Cake is perfect for various occasions—birthdays, anniversaries, or even just a cozy family gathering. This exquisite creation shines brightly as a centerpiece on dessert tables, captivating hearts and taste buds alike. Serve it with a side of freshly brewed tea or coffee, and watch as guests delight in each soft, velvety bite. For extra decadence, consider pairing slices with whipped cream or fresh berries, enhancing the sensory experience.
Common Mistakes For Pink Velvet Dream Cake
Avoiding common pitfalls is essential for baking success. One common mistake is using cold ingredients straight from the fridge; always allow eggs and buttermilk to reach room temperature for optimal results. Another error many make is overmixing the batter. It’s key to blend just until combined to ensure a tender cake. Lastly, remember to check your cake for doneness; even just a minute too long can lead to drying out this precious dessert.
Healthier Alternatives & Variations
For a lighter twist on the Pink Velvet Dream Cake, consider substituting half the all-purpose flour with whole wheat flour for added fiber while keeping the cake delightful. You can also replace buttermilk with unsweetened yogurt or a dairy-free alternative to cater to those with dietary restrictions. Experimenting with natural food coloring derived from beet juice is another wonderful way to enhance the cake’s color while keeping it healthy.
FAQs
-
Can I make the cake ahead of time?
Yes, you can bake the cake layers in advance. Just wrap them tightly in plastic wrap and store them in the refrigerator for up to three days or freeze for up to three months. -
Can I use other food colorings?
You can! Just ensure they are suitable for your dietary preferences. Natural food coloring is a great alternative. -
What can I substitute for buttermilk?
If you don’t have buttermilk, you can mix one cup of milk with one tablespoon of vinegar or lemon juice, letting it sit for a few minutes until it thickens slightly. -
How do I store leftovers?
Store the cake in an airtight container at room temperature for up to three days or refrigerate for up to a week. Be sure the frosting is tightly covered to maintain its freshness. -
Can I freeze the baked cake?
Yes! Wrap the cooled layers tightly and place them in the freezer. When ready to serve, thaw in the fridge and frost before enjoying. -
Is it possible to make this cake gluten-free?
Absolutely! Substitute the all-purpose flour with a gluten-free flour mix designed for baking, ensuring you follow the same measurements.
Conclusion
This Pink Velvet Dream Cake is not just a recipe but an invitation to create joy and love in your kitchen. With its irresistible charm and flavor profile, you’ll be tempted to bake it immediately. Imagine the delight on your loved ones’ faces as they savor each slice, relishing the delightfully tender texture and creamy frosting. Make this enchanting dessert the centerpiece of your next gathering—each bite is bound to evoke smiles, laughter, and cherished memories that last beyond the last crumb. So, roll up your sleeves and get ready to indulge in this dreamy cake today!
Pink Velvet Dream Cake
Ingredients
Method
- Preheat your oven to 350°F (175°C) and prepare two 9-inch round cake pans by greasing and flouring them.
- In a large bowl, whisk together the all-purpose flour, granulated sugar, baking soda, salt, and cocoa powder.
- In a separate bowl, combine the vegetable oil, buttermilk, eggs, red food coloring, white vinegar, and vanilla extract, whisking until blended.
- Gradually mix the wet ingredients into the dry ingredients until just combined.
- Divide the batter evenly between the prepared cake pans.
- Bake for 25-30 minutes or until a toothpick inserted in the center comes out clean.
- Allow the cakes to cool in the pans for 10 minutes, then transfer to a wire rack to cool completely.
- In a mixing bowl, beat the softened cream cheese and unsalted butter until smooth.
- Gradually add the powdered sugar and vanilla extract, beating until light and fluffy.
- Once the cakes are cooled, place one layer on a plate and frost the top generously with cream cheese frosting.
- Place the second layer on top and frost the top and sides of the cake.
- Decorate as desired with sprinkles or fresh fruits.