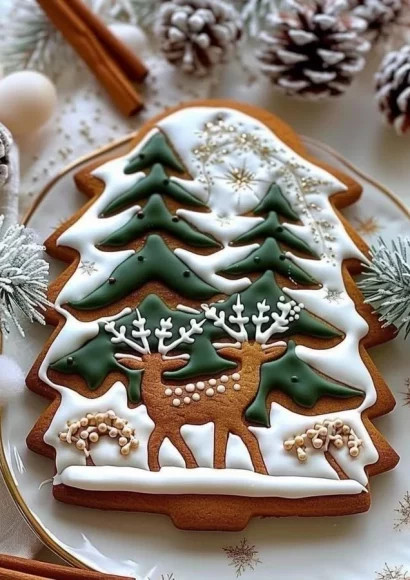
Gingerbread Cookies with Winter Forest Design
Gingerbread Cookies with Winter Forest Design embody the cozy aromas of the holiday season, enveloping your kitchen in a warm embrace. As spices like ginger, cinnamon, and cloves intertwine with the rich sweetness of molasses in this delightful recipe, you can almost see the flicker of candlelight bouncing off the frosted edges of these whimsical cookies. This step-by-step guide will take you through crafting exquisite gingerbread cookies that not only taste divine but also serve as charming decorations for your winter gatherings.
History / Fun Fact
Gingerbread has a storied history dating back to ancient civilizations where honey and spices were beloved. However, it truly gained popularity in Europe during the 15th century, where gingerbread was often molded into elaborate shapes and enjoyed during festivals. Some tales tell of gingerbread men originating from these Middle Ages celebrations, symbolizing good luck. The tradition of gingerbread houses also blossomed in Germany, popularized by the fairy tale "Hansel and Gretel." Today, these cookies continue to evoke nostalgia, bringing families together to create cheerful designs—perfect for your winter forest themes!
Ingredients
Creating Gingerbread Cookies with Winter Forest Design starts with a lovingly curated list of ingredients:
- 3 1/4 cups all-purpose flour: This flour provides the tender, crumbly texture essential for your cookies.
- 3/4 teaspoon baking soda: Acting as the leavening agent, it ensures your cookies rise beautifully.
- 1 tablespoon ground ginger: Adding a zesty kick, this spice fills the air with its warm aroma.
- 1 tablespoon ground cinnamon: Sweet and aromatic, it enhances the overall flavor profile.
- 1/4 teaspoon ground cloves: This spice brings a bold, slightly sweet touch.
- 1/4 teaspoon nutmeg: Adding warmth and depth to your cookies, it rounds out the spice mix.
- 1/2 teaspoon salt: Enhances flavors and balances sweetness.
- 1/2 cup unsalted butter, softened: Provides a rich, creamy base that contributes to the softness of your dough.
- 1/2 cup packed brown sugar: This adds a rich sweetness and moisture to the cookies.
- 1 large egg: A binding agent that helps hold your dough together.
- 2/3 cup unsulfured molasses: Imparts deep sweetness and a beautiful, dark color to your cookies.
- 1 teaspoon pure vanilla extract: Enhances the flavor with a sweet, floral note.
- 3 cups powdered sugar: For royal icing, this creates a smooth and satisfying finish.
- 2 large egg whites or 3 tablespoons meringue powder mixed with 6 tablespoons water: The base for royal icing, lending strength and flexibility.
- 1/2 teaspoon vanilla or almond extract: For an added flavor boost in your royal icing.
- Gel food coloring (green, white, brown, and optional blue): To bring your winter forest designs to life.
- Edible gold dust (optional for the deer): A touch of whimsy for those special decorations.
- Fine sugar or edible glitter for snow effect: Creates a sparkling finish reminiscent of freshly fallen snow.
- Piping bags and small piping tips (round and leaf tips): Essential tools for detailing your cookies perfectly.
Cooking Time & Tips For Gingerbread Cookies with Winter Forest Design
The cooking process for Gingerbread Cookies can range from a quick, fun activity to a more leisurely, thorough weekend project, depending on your preference. A quick preparation would involve minimal decorations and using simple shapes, whereas a slow, more meticulous approach lets your creative juices flow as you craft your cookie designs.
Quick Preparation Tips:
- Use store-bought royal icing to save time.
- Opt for simple shapes that require minimal decorating.
Slow Preparation Tips:
- Experiment with intricate designs and colors.
- Allow ample time for dough chilling, which enhances flavor and texture.
Regardless of your method, ensure you have all your ingredients ready and follow the step-by-step directions to ensure the best results!
Step-by-Step Directions
-
Whisk the Dry Ingredients: In a medium bowl, whisk together 3 1/4 cups of all-purpose flour, 3/4 teaspoon baking soda, 1 tablespoon ground ginger, 1 tablespoon ground cinnamon, 1/4 teaspoon ground cloves, 1/4 teaspoon nutmeg, and 1/2 teaspoon salt. This fragrant blend creates the perfect spice base for your cookies.
-
Cream the Butter and Sugar: In a large bowl, cream together 1/2 cup softened unsalted butter and 1/2 cup packed brown sugar until the mixture is light and fluffy, evoking an airiness that promises deliciousness. Add 1 large egg, 2/3 cup unsulfured molasses, and 1 teaspoon pure vanilla extract, mixing until everything is well combined.
-
Combine Wet and Dry Ingredients: Gradually add the dry mixture to the wet ingredients, stirring gently until a thick, sticky dough forms. If it’s too sticky to handle, add a little flour until you achieve the right consistency.
-
Chill the Dough: Divide the dough into portions and wrap each in plastic wrap. Chill in the refrigerator for at least 1 hour. This step not only deepens the flavors but makes rolling out the dough much easier.
-
Preheat the Oven: Preheat your oven to 350°F (175°C). Line your baking sheets with parchment paper, ready for the cookie creations that will soon emerge.
-
Roll and Cut Out Shapes: Take one portion of the chilled dough, roll it out on a floured surface to a thickness of about 1/4 inch. Use your favorite cookie cutters to create your desired shapes. Think of trees, deer, and snowflakes for that winter forest theme!
-
Bake the Cookies: Transfer the cut-out cookies onto the prepared baking sheets, ensuring they’re spaced apart. Bake in the preheated oven for about 8-10 minutes, or until the edges are golden brown. Your kitchen will smell heavenly during this time!
-
Cool the Cookies: Once baked, transfer the cookies to wire racks to cool completely. Patience is key here, as the icing won’t adhere properly to warm cookies.
-
Prepare Royal Icing: Beat together the egg whites until stiff peaks form. Gradually add in the powdered sugar and 1/2 teaspoon vanilla or almond extract, continuing to beat until the mixture is smooth and stiff. This glossy icing will act as glue for your decorations.
-
Color the Icing: Divide the icing into bowls and add gel food coloring to achieve the vibrant hues that will bring your winter forest to life.
-
Decorate Your Cookies: Using piping bags fitted with small tips, pipe your colored icing onto the cookies. Channel your inner artist and create swirling snowflakes, detailed trees, and charming woodland creatures. Add edible glitter or fine sugar to mimic snow or use edible gold dust to accentuate your decorations.
-
Drying: Allow the decorated cookies to dry completely before serving. This could take several hours depending on your icing thickness, but the wait is well worth the enchanting results.
Serving Suggestions & Occasions
Gingerbread cookies are wonderfully versatile and can be served for various occasions. They make an excellent centerpiece for holiday cookie platters or as delightful gifts wrapped in festive packaging. Consider setting up a cookie decorating station during holiday gatherings, allowing family and friends to personalize their creations. They can also serve as whimsical decorations for your winter-themed tablescapes!
Common Mistakes For Gingerbread Cookies with Winter Forest Design
- Over-mixing the Dough: This can lead to tough cookies. Mix until just combined for the best texture.
- Skipping Chilling Time: Chilling dough is crucial for cutting shapes. It prevents the dough from spreading during baking.
- Not Using Parchment Paper: Without it, cookies may stick to the baking sheet, and cleanup will be a hassle.
- Underbaking: Trust your sense of smell and look for those golden edges. Undercooked cookies can be chewy instead of crisp.
- Not Letting Icing Dry Properly: Patience is key! Undried icing will smudge and ruin your beautiful decorations.
Healthier Alternatives & Variations
If you’re looking for healthier alternatives:
- Whole Wheat Flour: Substitute half of the all-purpose flour for whole wheat flour for added fiber.
- Less Sugar: Reduce brown sugar slightly or substitute with natural alternatives like honey or maple syrup while adjusting the liquid content.
- Nut Butter: Replace some butter with a nut butter for healthier fats and a unique flavor twist.
For variations, think about:
- Adding Zest: Lemon or orange zest for freshness.
- Rolling in Nuts: Chopped nuts for extra texture.
FAQs
-
Can I freeze gingerbread cookies?
Yes, they freeze well! Store them in airtight containers for up to three months. -
How long do decorated cookies last?
If stored properly, cookies can last up to a week at room temperature. -
Can I make the dough in advance?
Absolutely! The dough can be made and refrigerated for up to a week or frozen for longer. -
Why does my dough seem too dry?
If it feels crumbly, add a bit more molasses or a touch of water until the dough comes together. -
How can I get my icing to be smooth?
Make sure to beat the icing to stiff peaks and add powdered sugar gradually to avoid lumps. -
What if I don’t have piping bags?
You can use ziplock bags with a small corner snipped off as a quick, easy alternative.
Conclusion
Gingerbread Cookies with Winter Forest Design are more than just a treat; they are a delightful journey filled with family memories, creativity, and the enchanting essence of winter. The magical spices and cozy presentation create a sensory wonderland that no one can resist. Try this recipe today and immerse yourself in the joy of baking—before you know it, your kitchen will be brimming with laughter, love, and sweet aromas. Your winter celebrations await, so roll up your sleeves and let these cookies bring a touch of warmth into your home!
Gingerbread Cookies with Winter Forest Design
Ingredients
Method
- Whisk the Dry Ingredients: In a medium bowl, whisk together the dry ingredients until well combined.
- Cream the Butter and Sugar: In a large bowl, cream together the softened butter and brown sugar until light and fluffy. Add the egg, molasses, and vanilla extract, mixing until well combined.
- Combine Wet and Dry Ingredients: Gradually add the dry mixture to the wet ingredients, stirring gently until a thick, sticky dough forms. Adjust with flour if too sticky.
- Chill the Dough: Wrap the dough in plastic wrap and chill in the refrigerator for at least 1 hour.
- Preheat the Oven: Preheat your oven to 350°F (175°C) and prepare baking sheets with parchment paper.
- Roll and Cut Out Shapes: Roll out the chilled dough and cut desired shapes.
- Bake the Cookies: Transfer the cookies to the baking sheets and bake for about 8-10 minutes.
- Cool and Prepare Royal Icing: Cool the cookies completely before icing. Beat egg whites and mix with powdered sugar and extract.
- Color the Icing: Divide the icing and color as desired.
- Decorate Your Cookies: Use piping bags to decorate with colored icing and add edible glitter or dust.
- Drying: Allow the decorated cookies to dry completely before serving.