
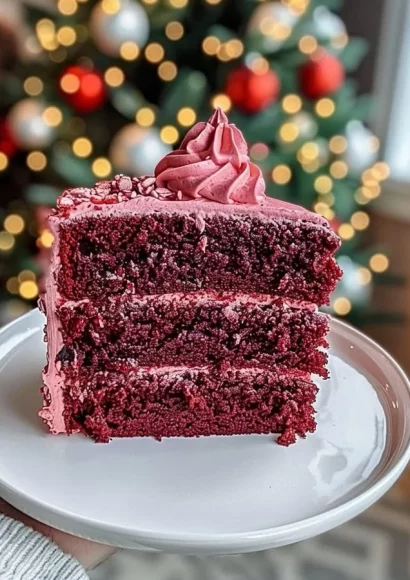
Classic Red Velvet Cake with Creamy Frosting
Classic Red Velvet Cake with Creamy Frosting is a dessert that truly steals the show. This strikingly vibrant cake, with its deep red color and inviting layers of velvety texture, evokes a sense of celebration and indulgence. The combination of rich cocoa flavor paired with the sweet creaminess of a perfectly crafted frosting transforms any occasion into a memorable event. Whether it’s a birthday, anniversary, or just a cozy afternoon treat, baking this cake is absolutely worth every minute. With our step-by-step recipe, you’ll find it easy and rewarding to create a stunning masterpiece that will impress your friends and family!
Why You’ll Love This Recipe
This Classic Red Velvet Cake offers numerous benefits that make it an excellent choice for bakers of all levels. The prep is simple, making it a stress-free baking experience. Even if you’re short on time, this cake allows for a straightforward method that gets you to results quickly without sacrificing quality. Family-friendly and always a crowd pleaser, this cake uses minimal ingredients, meaning less fuss and more bliss! Plus, experimenting with the vibrant red aesthetic adds an element of fun in the kitchen, making it a perfect bonding activity with loved ones.
Ingredients for Classic Red Velvet Cake with Creamy Frosting
To create this delightful cake, gather the following ingredients:
- 2 1/2 cups all-purpose flour: This forms the cakey base, giving it structure.
- 1 1/2 cups granulated sugar: Adds the necessary sweetness to balance the flavors.
- 1 teaspoon baking soda: Ensures the cake rises, creating that fluffy texture.
- 1 teaspoon salt: Enhances all the flavors for a well-rounded taste.
- 1 teaspoon cocoa powder: A subtle chocolate flavor that pairs beautifully with the red velvet.
- 1 1/2 cups vegetable oil: Keeps the cake moist and tender.
- 1 cup buttermilk, at room temperature: Provides moisture and adds a slight tang.
- 2 large eggs: Binds the ingredients together while contributing to the cake’s richness.
- 1 teaspoon pure vanilla extract: Infuses a lovely aroma and flavor.
- 1 teaspoon white vinegar: Pairs with baking soda to help the cake rise.
- 1 tablespoon red food coloring: This is what gives the cake its signature hue.
For the frosting:
- 1 cup unsalted butter, softened: The creamy base of your frosting.
- 4 cups powdered sugar, sifted: Sweetens and thickens the frosting.
- 1 teaspoon pure vanilla extract: Enhances flavor and aroma.
- 4–6 tablespoons heavy cream or milk (to adjust consistency): Provides a smooth finish.
- Optional: Additional red food coloring for a vibrant frosting.
Step-by-Step Directions for Classic Red Velvet Cake with Creamy Frosting
-
Preheat the oven: Set your oven to 350°F (175°C). Prepare two 9-inch round cake pans by greasing and flouring them or lining them with parchment paper for easy removal.
-
Mix dry ingredients: In a large mixing bowl, whisk together the all-purpose flour, granulated sugar, baking soda, salt, and cocoa powder, creating a fluffy blend of dry ingredients.
-
Combine wet ingredients: In a separate bowl, whisk together the vegetable oil, buttermilk, eggs, vanilla extract, vinegar, and red food coloring until the mixture is smooth and thoroughly combined.
-
Fold ingredients together: Slowly incorporate the wet mixture into the dry ingredients. Stir gently until everything is well-combined, taking care not to overmix—just until the batter is smooth.
-
Divide and bake: Pour the batter evenly into your prepared cake pans. Place them in the oven and bake for 25-30 minutes or until a toothpick inserted into the center comes out clean.
-
Cool the cakes: Allow the cakes to cool in the pans for about 10 minutes before carefully transferring them to a wire rack to cool completely, which ensures proper frosting later.
-
Prepare the frosting: In a mixing bowl, beat the softened butter until it’s light and fluffy, then gradually add the sifted powdered sugar until well-blended.
-
Finish the frosting: Add the vanilla extract to the mixture, then slowly incorporate heavy cream or milk until you achieve the desired consistency.
-
Assemble the cake: On your serving plate, place one cake layer and generously spread frosting over the top. Add the second layer and frost the top and all sides of the cake for a cohesive look.
-
Serve and enjoy: Slice the beautifully crafted cake and serve immediately, savoring the reactions it inspires.
Tips & Tricks
- For an ultra-smooth frosting, ensure your butter is at room temperature before starting. It helps blend easily and creates a lighter texture.
- Experiment with flavors! Consider adding a hint of almond extract to the frosting for a unique twist.
- If you want a more decadent experience, add a layer of cream cheese frosting in between the cake layers for an extra creamy surprise.
- If still, it’s too warm after baking, be patient in letting the cakes cool completely to avoid melting your frosting.
Serving Suggestions & Pairings
When serving your Classic Red Velvet Cake, presentation is key! Consider garnishing each slice with chocolate shavings, fresh berries, or a light dusting of powdered sugar for an elegant touch. Pair the cake with a refreshing glass of iced tea or a rich cup of coffee to balance its sweetness. For a delightful contrast, serve alongside a scoop of vanilla ice cream or a dollop of whipped cream to elevate your dessert experience!
Nutritional Information
A standard slice of Classic Red Velvet Cake contains approximately 350-400 calories. It includes carbohydrates, fats, and proteins, with sugar being the primary sweetening agent. If you’re looking to indulge, remember that moderation is the key—it’s a treat designed for enjoyment!
Storing Tips & Variations for Classic Red Velvet Cake with Creamy Frosting
To maintain freshness, store any leftover cake in an airtight container in the refrigerator for up to five days. Freezing this cake is also an option; simply wrap individual slices or the whole cake tightly in plastic wrap and store in a freezer-safe container. It can last for up to three months. For variations, try making cupcakes instead of a traditional cake, or experiment with different food coloring to create pastel versions for holidays or themed gatherings.
Conclusion for Classic Red Velvet Cake with Creamy Frosting
Don’t wait another moment to dive into the enchanting world of baking with our Classic Red Velvet Cake! It’s time to unleash your inner chef and create a dessert that dazzles not just in flavor but in appearance as well. Gather your ingredients and start your baking adventure today—your taste buds will thank you!
FAQs
1. Can I make this cake without buttermilk?
Yes! If you don’t have buttermilk, you can substitute it by adding 1 tablespoon of vinegar or lemon juice to 1 cup of milk. Let it sit for 5 minutes before using.
2. Can I use cake flour instead of all-purpose flour?
Absolutely! Cake flour will give you a lighter texture. Just use the same measurement as specified in the recipe.
3. Can I make this recipe gluten-free?
Yes! Substitute the all-purpose flour with a gluten-free flour blend, and be sure it contains a binding agent like xanthan gum for the best results.
4. How can I adjust the sweetness of the frosting?
You can easily reduce the powdered sugar by 1 cup or add a pinch of salt to balance the sweetness to your liking.
5. Is it okay to use a different color for the cake?
Certainly! While traditional red is stunning, feel free to experiment with other colors to mark special occasions—just remember to adjust the amounts of food coloring accordingly!
Classic Red Velvet Cake with Creamy Frosting
Ingredients
Method
- Preheat the oven: Set your oven to 350°F (175°C) and prepare two 9-inch round cake pans by greasing and flouring them or lining them with parchment paper.
- Mix dry ingredients: In a large mixing bowl, whisk together the all-purpose flour, granulated sugar, baking soda, salt, and cocoa powder.
- Combine wet ingredients: In a separate bowl, whisk together the vegetable oil, buttermilk, eggs, vanilla extract, vinegar, and red food coloring until smooth.
- Fold ingredients together: Slowly incorporate the wet mixture into the dry ingredients, stirring gently until smooth.
- Divide and bake: Pour the batter into your prepared cake pans and bake for 25-30 minutes or until a toothpick inserted comes out clean.
- Cool the cakes: Allow the cakes to cool in the pans for 10 minutes before transferring them to a wire rack to cool completely.
- Prepare the frosting: In a mixing bowl, beat the softened butter until fluffy, then gradually add the sifted powdered sugar.
- Finish the frosting: Add vanilla extract and incorporate heavy cream or milk until desired consistency is achieved.
- Assemble the cake: Place one cake layer on a serving plate, spread frosting over the top, then add the second layer and frost the top and sides.
- Serve and enjoy: Slice the cake and serve immediately.