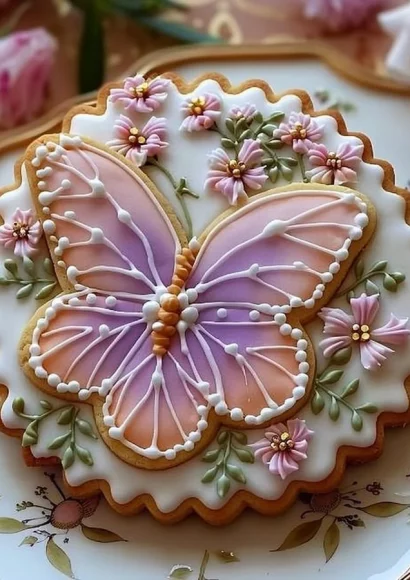
Floral Butter Cookies with Royal Icing
Baking Floral Butter Cookies with Royal Icing is a delightful experience that envelops the kitchen in a fragrant embrace of sweet aromas. This recipe is a step-by-step guide to crafting beautiful and tender cookies that celebrate the essence of springtime. Picture a light, buttery texture that melts in your mouth, paired beautifully with a dainty, pastel-hued royal icing that transforms each cookie into a decorative masterpiece. With every bite, you’ll feel not just a sense of satisfaction but also delight, making these cookies perfect for any occasion or just as a special treat for yourself.
History / Fun Fact
Floral Butter Cookies have a charming origin that dates back to classic European baking traditions, brought to life by a desire to celebrate nature’s beauty in edible form. The concept of shaping cookies to resemble flowers reflects a long-standing affinity for intricate designs, often found in royal and festive occasions. These cookies were frequently seen at tea parties and holiday celebrations, embodying a spirit of elegance and cheer. Today, these cookies continue to evoke nostalgia while allowing bakers to unleash their creativity with floral designs, wrapping a delightful story in each beautifully crafted treat.
Ingredients
- 2 1/2 cups all-purpose flour – The foundation of our cookies, fluffy and fine, will form the tender base that crumbles beautifully.
- 1 cup unsalted butter, softened – Buttery and creamy, this adds richness, providing that melt-in-your-mouth texture.
- 3/4 cup powdered sugar – Sweet and velvety, integrating this sugar creates a delicate sweetness that balances the butter’s richness.
- 1 large egg – Bind it all together while adding a soft, moist texture; vital for the perfect cookie structure.
- 1 tsp vanilla extract – Aromatic and warm, this flavor enhances the sweetness, wrapping the cookies in a comforting embrace.
- 1/4 tsp salt – A pinch that intensifies the sweetness while balancing the flavors beautifully.
- Royal icing (store-bought or homemade) – The finishing touch – smooth, glossy, and perfect for adding intricate floral designs to your cookies.
Cooking Time & Tips For Floral Butter Cookies
When preparing Floral Butter Cookies, time can play a role in the final outcome. Quick preparation may yield cookies that are enjoyable but lack the depth of flavor achieved through slower methods. Allowing your dough to chill in the refrigerator enhances the flavors as well as the handling of the dough, making it easier to shape without losing its delicate crumb.
For success, consider using high-quality butter and allow it to soften at room temperature before creaming. This ensures that the butter and sugar blend harmoniously, trapping air and resulting in airy cookies. Moreover, measuring your ingredients accurately, especially flour, will keep the dough consistent.
Step-by-Step Directions
-
Preheat your oven – Start by preheating your oven to 350°F (175°C), creating an ideal environment for those cookies to bake just right.
-
Cream butter and sugar – In a large mixing bowl, beat the softened butter and powdered sugar together until the mixture is light and fluffy. You’ll notice a lovely creamy texture forming, and the sweetness filling the space around you.
-
Add egg and vanilla – Incorporate the large egg and vanilla extract, continuing to mix until the batter is smooth, rich, and enticingly fragrant.
-
Mix in flour and salt – Gradually add in the all-purpose flour along with a pinch of salt and combine until a soft dough starts to form; don’t rush this step. Enjoy the feel of the dough coming together beneath your fingertips.
-
Roll out the dough – On a lightly floured surface, roll out your dough to about 1/4 inch thick. The surface should feel silky as you spread it out.
-
Cut into flower shapes – Using cookie cutters, cut out flower shapes from the dough, letting your creativity shine as you create a delightful assortment.
-
Bake the cookies – Place the cut cookies onto a parchment-lined baking sheet with adequate spacing. Bake in the preheated oven for about 10-12 minutes or until the edges are golden brown, filling your kitchen with an irresistible aroma.
-
Cool and decorate – Let your cookies cool completely on a wire rack before taking the decorating plunge! Once cooled, unleash your artistic side with the royal icing, crafting beautiful floral designs to top off your creations.
Serving Suggestions & Occasions
Floral Butter Cookies with Royal Icing are not just delicious; they are an artistic expression ideal for various occasions. Serve these cookies at tea parties where friends can savor each bite while enjoying the intricate designs. They also make perfect treats for weddings, baby showers, or even as charming favors for guests. Pair them with a fragrant herbal tea or a rich coffee to enhance the flavors. The cookies can also be packaged beautifully as gifts, showcasing their exquisite designs alongside heartfelt gestures.
Common Mistakes For Floral Butter Cookies
Several pitfalls may present themselves when crafting your Floral Butter Cookies. One common mistake is skipping the chilling step for the dough, resulting in softer, more difficult-to-handle dough and a blobby final product. Ensure that your butter isn’t too warm when creaming; if it is excessively melted, your cookies may spread too much during baking.
Additionally, be cautious with the flour measurement—too much flour can lead to dry cookies. Lastly, not allowing the cookies to cool properly before decorating can cause the royal icing to melt and lose its shape, negating all your artistic efforts!
Healthier Alternatives & Variations
While Floral Butter Cookies are a wonderful indulgence, making them a bit healthier is definitely an option. Consider substituting half of the butter with unsweetened applesauce or nut butter for a slight reduction in calories while maintaining moisture. For a gluten-free version, use oat flour or almond flour combined with a binding agent to hold the cookie together.
Variations can also be explored with flavors! Experiment with almond extract instead of vanilla, or add zest from citrus fruits like lemon or orange for a refreshing twist. Additionally, incorporating various natural food colorings can elevate your royal icing to reflect seasonal themes.
FAQs
-
Can I freeze the cookie dough?
Yes! You can freeze the dough before rolling it out. Wrap it tightly in plastic wrap and store it in an airtight container for up to three months. -
How can I store the decorated cookies?
Store your decorated cookies in an airtight container at room temperature, making sure they are not stacked to avoid smudging the icing. -
Can I use a different icing, instead of royal icing?
Absolutely! You can use a simple glaze or fondant for decoration, but royal icing sets harder, allowing for intricate designs. -
What if my royal icing is too runny?
If your icing is too runny, you may need to add more powdered sugar gradually until you achieve the desired consistency. -
Do I have to use cookie cutters?
No, you can shape the cookies by hand or use molds if you want to create unique shapes. -
Can I add other flavors to my cookie recipe?
Yes! Feel free to experiment by adding spices like cinnamon or nutmeg or incorporating chocolate chips for a delightful twist.
Conclusion
The allure of Floral Butter Cookies with Royal Icing is undeniable. They embody not only sweetness but craftsmanship, telling a story with every delicate petal and intricate design. Whether you’re gathering with loved ones or treating yourself, these cookies are sure to light up any occasion. So why wait? Gather your ingredients and dive into this step-by-step adventure, creating something beautiful and delicious that everyone will cherish for years to come! You won’t regret taking the leap into this delightful baking journey!

Floral Butter Cookies with Royal Icing
Ingredients
Method
- Preheat your oven to 350°F (175°C).
- In a large mixing bowl, beat the softened butter and powdered sugar together until light and fluffy.
- Incorporate the egg and vanilla extract, mixing until the batter is smooth.
- Gradually add the all-purpose flour and salt, combining until a soft dough forms.
- Roll out the dough to about 1/4 inch thick on a floured surface.
- Cut out flower shapes using cookie cutters.
- Place the cut cookies onto a parchment-lined baking sheet with adequate spacing.
- Bake for about 10-12 minutes or until the edges are golden brown.
- Let the cookies cool completely on a wire rack before decorating.
- Once cooled, decorate with royal icing, creating beautiful floral designs.