
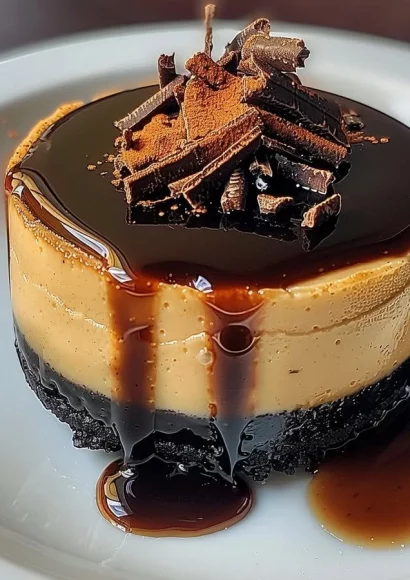
Mini Espresso Cheesecake Desserts
Get ready to delight your senses with these Mini Espresso Cheesecake Desserts. These decadent little bites are the perfect combination of creamy, rich cheesecake infused with aromatic espresso, set atop a buttery graham cracker crust. This recipe is crafted in a step-by-step manner to guarantee that the result is nothing short of perfect. Your kitchen will be filled with enticing aromas, and your taste buds will be dancing with joy as you savor each bite of these delightful desserts.
History / Fun Fact
Cheesecake has a rich history that dates back to ancient Greece, where it was served to athletes during the first Olympic Games. The modern version we enjoy has evolved over centuries, with New York cheesecake standing out as a favorite. The addition of espresso takes this classic dessert into a new realm of flavor, appealing not only to cheesecake lovers but also to coffee aficionados. The combination of creamy richness with a robust coffee undertone in these mini cheesecakes reflects a merger of cultures and tastes, making them a sophisticated yet fun treat for any occasion.
Ingredients
For the crust:
- 1 cup graham cracker crumbs – sweet, crumbly bites that offer a delightful crunch.
- 1/4 cup granulated sugar – adds a touch of sweetness to balance the flavors.
- 1/2 cup unsalted butter, melted – rich and luscious, it binds the crust beautifully.
For the cheesecake filling:
- 16 ounces cream cheese, softened – silky and creamy, the base of our delightful filling.
- 1 cup powdered sugar – for that perfect hint of sweetness that melts in your mouth.
- 1 tablespoon vanilla extract – aromatic and warm, it enhances the cheesecake’s flavor.
- 2 tablespoons espresso or strong coffee, cooled – bold and inviting, this coffee infusion adds depth.
- 2 large eggs – they provide structure and richness to the cheesecake.
For toppings:
- Whipped cream for topping – light, fluffy, and creamy, it’s the perfect crown for our mini sweets.
- Chocolate shavings or cocoa powder for garnish – a touch of elegance that elevates the presentation.
Cooking Time & Tips For Mini Espresso Cheesecake Desserts
Preparing these mini cheesecakes can take between 20-25 minutes of baking time and a couple of hours of chilling. The beauty of these little desserts lies in their quick preparation. Quick recipes allow for immediate indulgence, whereas slower, more gradual methods yield a richer flavor infusion. Here’s a practical tip: If you want a more intense espresso flavor, allow your coffee to cool before adding it to your filling – this enhances its aromatic qualities without altering the texture.
Additionally, don’t hesitate to taste the filling before baking; this allows you to adjust the sweetness to your preference.
Step-by-Step Directions
-
Preheat the oven: Begin by preheating your oven to 325°F (160°C). This ensures that your mini cheesecakes bake evenly.
-
Prepare the muffin tin: Line a muffin tin with paper liners. This will make it easy to remove the cheesecakes once they are baked.
-
Make the crust: In a medium bowl, combine the graham cracker crumbs, granulated sugar, and melted butter. Mix until the texture resembles wet sand. Press about 1 tablespoon of this mixture into the bottom of each muffin liner. Feel the satisfying crunch as you mold each crust to form the perfect base for your cheesecake.
-
Prepare the filling: In a large mixing bowl, beat the cream cheese until it becomes creamy and smooth. Gradually add the powdered sugar, mixing until well incorporated. The sweetness should blend seamlessly with the creamy texture.
-
Add flavors: Incorporate the vanilla extract and cooled espresso into your cream cheese mixture, then gently beat in the eggs. It’s essential to mix until just combined – overmixing can lead to cracks in your cheesecakes.
-
Fill the cups: Carefully pour the cheesecake batter over each crust until they are roughly 3/4 full, leaving a little space for rising.
-
Bake: Place your muffin tin in the oven and bake for 20-25 minutes, or until the centers are set but still have a slight jiggle. This is where the anticipation builds – your kitchen will be filled with the warm aroma of coffee and cream!
-
Cool: Once baked, let the cheesecakes cool in the pan for about 10 minutes, then transfer them to a wire rack to cool completely. Your patience will be rewarded when you eventually taste them!
-
Chill: After cooling, chill the mini cheesecakes in the refrigerator for at least 2 hours. This step is crucial for achieving the right texture – creamy, yet set.
-
Serve: Before serving, top with a dollop of whipped cream and sprinkle with chocolate shavings or cocoa powder for that artisanal touch.
Serving Suggestions & Occasions
These Mini Espresso Cheesecake Desserts are perfect for a variety of occasions. Serve them at your next gathering, coffee date, or book club meeting. The individual portions make them ideal for parties or casual get-togethers. Pair them with a fresh cup of espresso or a creamy latte—truly a match made in coffee and dessert heaven!
Common Mistakes For Mini Espresso Cheesecake Desserts
-
Overmixing the batter: This can lead to cracks in your cheesecakes during baking. Mix just until combined for the best texture.
-
Skipping the chilling step: Not allowing the cheesecakes to set in the refrigerator may result in a texture that is too soft.
-
Using cold cream cheese: Make sure your cream cheese is at room temperature for a smooth filling.
-
Filling the crusts too full: Leave some space, as the cheesecakes will rise during baking.
Healthier Alternatives & Variations
If you’re looking for a lighter take on this dessert, consider using low-fat cream cheese or Greek yogurt instead of regular cream cheese. You can also substitute the granulated sugar with healthier sweeteners such as honey or coconut sugar. For variations, try adding different flavors like hazelnut or caramel to the batter. The crust can also be made with almond flour for a gluten-free option.
FAQs
-
Can I make these cheesecakes ahead of time?
Yes, they can be prepared a day in advance and stored in the refrigerator. -
Can I freeze Mini Espresso Cheesecake Desserts?
Yes, they freeze well! Just wrap them tightly in plastic wrap and store in an airtight container. -
Can I replace the espresso with a different flavor?
Absolutely! Feel free to experiment with flavors like vanilla or chocolate for a delicious twist. -
How long will these cheesecakes last in the fridge?
They’ll stay fresh for about 3-5 days when stored in an airtight container. -
What can I use instead of graham crackers for the crust?
Digestive biscuits, almond flour, or even crushed Oreos are great alternatives. -
Can I use flavored cream cheese?
Yes! Flavored cream cheeses can enhance the overall taste and flair of your mini cheesecakes.
Conclusion
Now that you’ve mastered the art of making Mini Espresso Cheesecake Desserts, it’s time to indulge in this delightful treat. The creamy filling, rich espresso flavor, and crunchy crust come together to create a dessert that is sure to impress. Don’t wait—gather your ingredients and bring this recipe to life in your kitchen. Trust us, a bite of these mini delights will leave you craving more!
Mini Espresso Cheesecake Desserts
Ingredients
Method
- Preheat your oven to 325°F (160°C) to ensure even baking.
- Line a muffin tin with paper liners for easy removal after baking.
- In a medium bowl, combine graham cracker crumbs, granulated sugar, and melted butter. Mix until the texture resembles wet sand.
- Press about 1 tablespoon of the mixture into the bottom of each muffin liner to form the crust.
- In a large bowl, beat the cream cheese until creamy and smooth.
- Gradually add powdered sugar and mix until well incorporated.
- Incorporate vanilla extract and cooled espresso into the mixture, then gently beat in the eggs until just combined.
- Carefully pour the cheesecake batter over each crust until they are roughly 3/4 full.
- Place the muffin tin in the oven and bake for 20-25 minutes or until the centers are set but still have a slight jiggle.
- Let the cheesecakes cool in the pan for about 10 minutes.
- Transfer them to a wire rack to cool completely.
- Chill the mini cheesecakes in the refrigerator for at least 2 hours.
- Before serving, top with a dollop of whipped cream and sprinkle with chocolate shavings or cocoa powder.

